
Click >> Next

The next screen we’ll see will be the selection for the setup type for our installation. We’re going to select Custom because we have a few custom requests for the installer to perform. Click >> Next

We will need to change the location for the installation, so we’ll just select MySQL Server and then click on the Change button located in the bottom right.

Simply type in the location, in this case we’ll use “C:\server\mysql” as this is where the rest of our server applications are being installed. Then click on Ok.
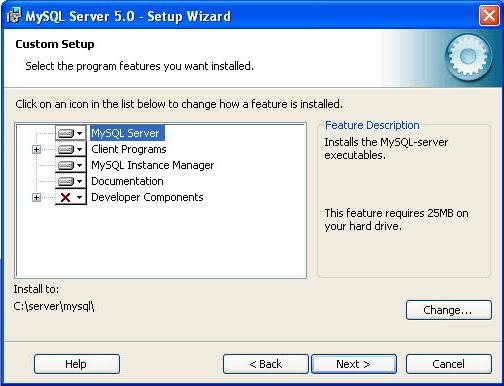
This will look like after we have customize the folder Click >> Next

We are now ready to install, just click on Install button

When it’s installing, we’ll see a window similar to this and will disappear automatically when finished.

This is to setup an account on MySQL.com for updates and so on, we’ll just select Skip for the time being and we can take care of this later. Click >> Next

Now we get to configure the server to run the way we’d like for it to run. Just click Finish button

This screen is the start page for the Server Instance Configuration Wizard.
Simply click on Next

We’ll want to select Standard Configuration from the next screen. Remember this is for new installations of MySQL. Users that already have MySQL installed and are upgrading, please select Detailed Configuration. Click >> Next

Now we get to make a few choices about our server, for this project we’ll use “Install As Windows Service” and make sure “Launch the MySQL Server automatically” option is checked. This will insure the MySQL server is started if it ever shuts down, or the system ever restarts. Click >> Next

Next we’ll need to select a root password, simply type a password you’d like to use for root access and let’s write it down so we don’t forget it. Also remember to check “Enable root access from remote machines” ONLY IF you want to edit anything from a remote location later on.

The next screen is simply the start screen for the configuration utility, letting us know what it’s about to perform. Simply click on Execute.

When Start Service is error, try to change the name of the service in previous screen (Choose Detailed Configuration)

If there's an error like this screen, then, it maybe because your Computer Firewall block TCP port 3306 for connections. Just go to Start Program => Control Panel => Windows Firewall. If you haven't encounter this problem, you can skip to the next step

After that, click Exceptions tab, and click Add Port button

Just insert:Name: MySQL ConnectionsPort Number: 3306
and make sure, you choose TCP
Click >> OK
Click OK again to exit Windows Firewall options
Back to the MySQL Configuration Screen, press retry to continue the configuration
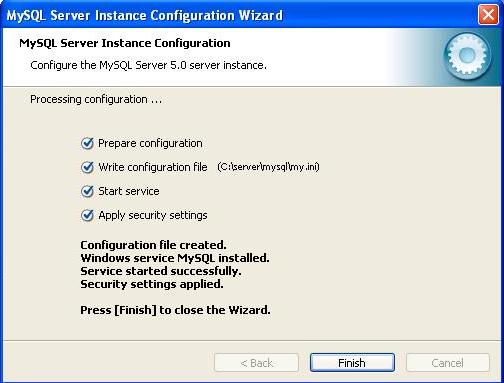
Once everything is finished it will look like this. This give a little information about what has happened and show that everything goes well.Click Finish button
Once we’ve finished the installation, we can run MySQL application to make sure that MySQL is installed and working properly.

Find the folder in the start menu where MySQL is located and launch the “MySQL Command Line Client”

Once it's open, simply enter the password we just set and if the client allows access with no errors, MySQL is now installed and working properly. There is no need to leave this command line client open, simply type “exit” and enter. This should close the client out. We now have finished installing MySQL and it’s working correctly.

No comments:
Post a Comment